Assignments in Brightspace are typically used for student submissions of papers, presentations, essays, or other text or file submissions for evaluation.
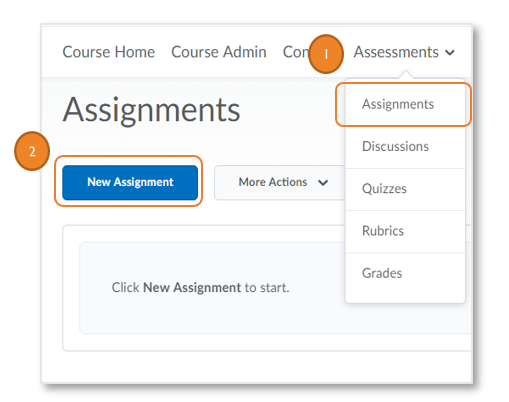
Create an Assignment from Content
- Inside your course, navigate to the Assignment tool on your navbar (Assessments > Assignments, or Course Admin > Assignments)
- Click New Assignment
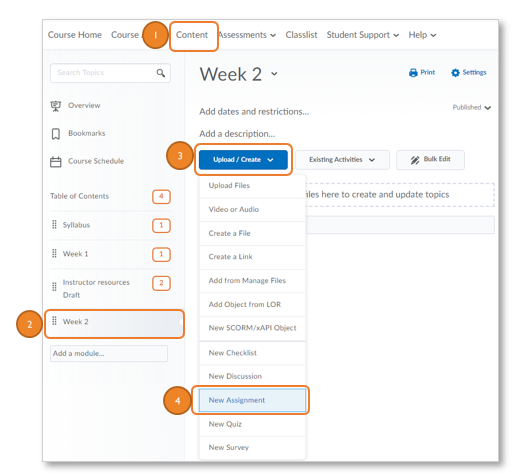
Create an Assignment from the Assignment Tool
- Inside your course, navigate to Content on your navbar
- Click on the module on the left navigation pane where you want to add a new assignment
- Click on Upload/Create and
- Select New Assignment from the dropdown menu
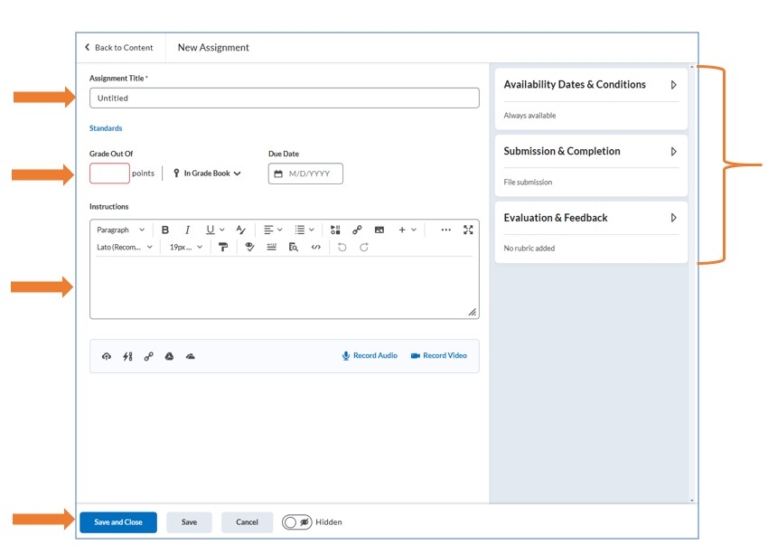
- Enter a Title for the assignment.
- If you want it connected to the gradebook, enter a point value and ensure it says “In Grade Book”
- Add a Due Date for the assignment (optional)
- Add Instructions for the assignment.
- On the right, expand each accordion menu to add more settings:
Availability Dates and Conditions: add a Start and End Date or Release Conditions
Submission and Completion: change the assignment type and details
Evaluation & Feedback: attach a Rubric or enable CopyLeaks.
- When finished with the settings, toggle the Hidden icon to make it visible to students.
- Click Save and Close
Accordion Settings and Options
Availability Dates and Conditions
- Start Date: When you want it to become available to students
- End Date: When you want it to become unavailable to students
- Release Conditions: Settings to create special rules for when students can access or view the assignment
- Special Access: Allows you to set special dates for specific users
Submission & Completion
- Assignment Type: Individual or Group assignment
- Submission Type: File Submission, Text Submission, On Paper, or Observed in Person (choose ‘file’ for students to upload a word document or ‘text’ for students to type in their submission without uploading a file)
- Files Allowed Per Submission: ‘Unlimited’ allows students to submit multiple files at once. ‘One File’ allows only one file to be uploaded at a time.
- Allowable File Extensions: Allows you to limit what type of files you want to accept
- Submissions: Allows you to determine how many times students can submit.
- Notification Email: Allows you to add your email address if you want to receive an email for every submission received.
Evaluation & Feedback
- Add Rubric: Add an existing Rubric or build and attach a rubric
- Manage CopyLeaks: Enable CopyLeaks’ ai and similarity reports
Leave a Reply
Want to join the discussion?Feel free to contribute!