Please note: These instructions have been updated for the “New” Quiz Creation Experience (July 2023)
Create a New Quiz from Content
1. Go to Content in your course
2. Navigate to the module where you want the quiz to appear
3. Click on Upload/Create button
4. Select New Quiz from the dropdown menu
You will be taken to the Quiz Setup tool
Create a New Quiz from the Quizzes Tool
1. Go to Quizzes tool (Course Admin > Quizzes)
2. Click New Quiz
You will be taken to the Quiz Setup tool
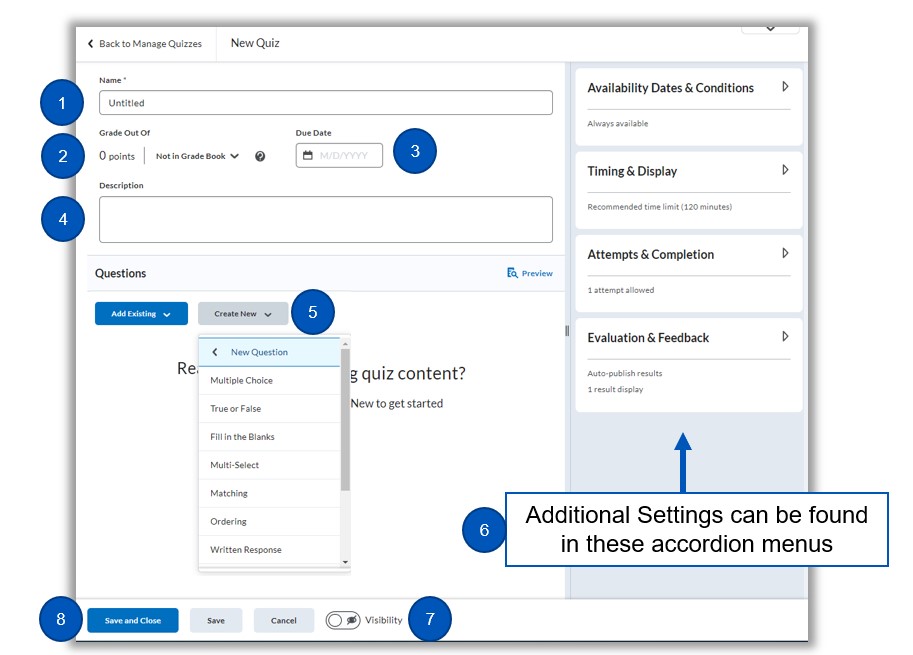
- Enter a Quiz Name
- Decide if you want to Add to Gradebook (recommended)
- Add a Due Date (optional)
- Add a Description (instructions for students to view before they start the Quiz)
- Add questions (Create New)– see below
- Complete additional settings using the accordion menus on the right (Availability, Timing, Attempts, Evaluation and Feedback)
- Change Visibility
- Click Save and Close
Adding Questions
- Click Create New and choose the question type from the dropdown menu
- Add the question text and identify the correct answer
- Click Save, or, Save and New, or Save and Copy
- Continue adding the remaining questions to your exam
- When finished, click Save and Close
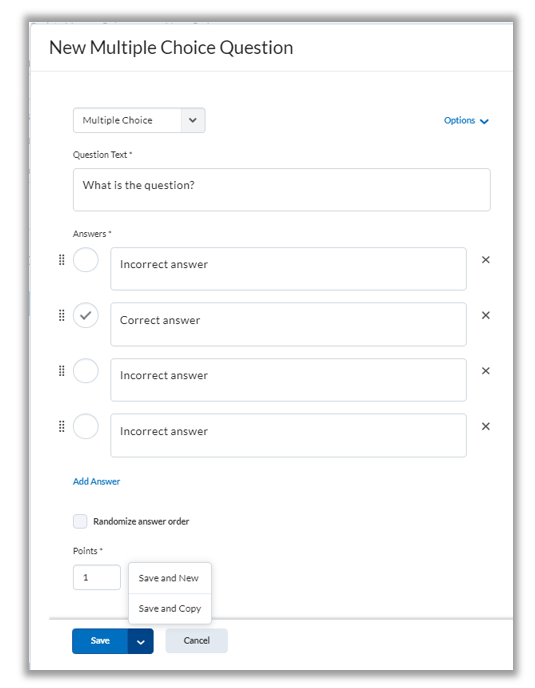
Example of a multiple choice question – creation screen
Quiz Settings (right-hand side of Quiz Setup interface)
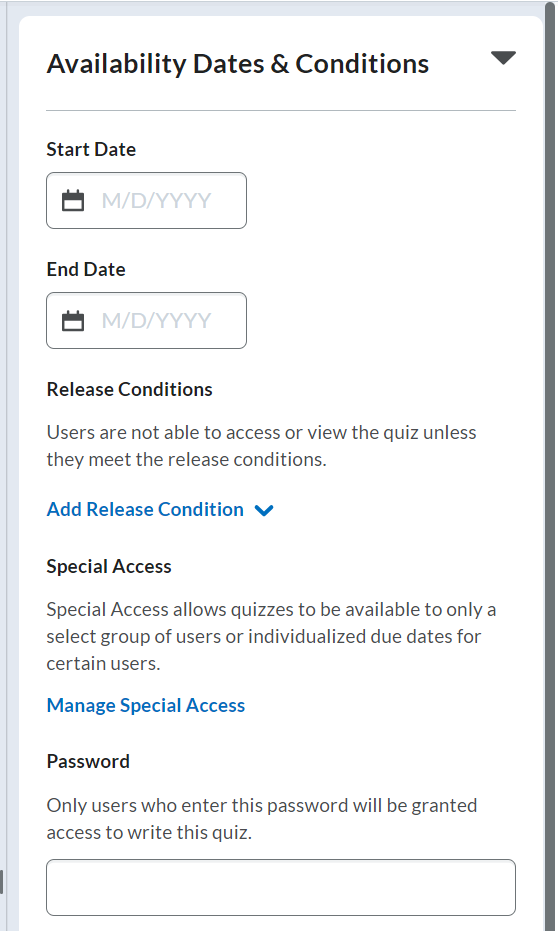
Availability Dates and Conditions
Start Date: When the quiz can be accessed by students
End Date: When the quiz can no longer be accessed by students
Display in Calendar: Checking this box will show the Start and End dates in the calendar in addition to the Due Date which will appear in the calendar regardless.
Release Conditions: Release conditions prevent students from taking a quiz unless another action/task has been met.
Manage Special Access: Allows you to make a Quiz only available to a select group of users or give an individual different a different due date, access date, or allocated time and attempts.
Password: Only users who enter this provided password will be able to access the quiz
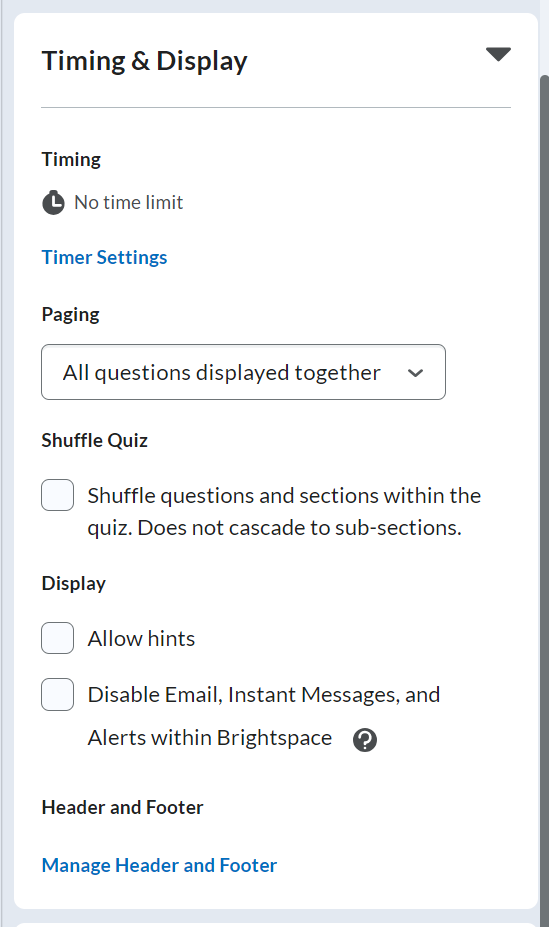
Timing & Display
Timing Settings:
No Time Limit: quiz is not timed
Recommended Time Limit: instructor provides an amount of time that is recommended for the quiz, but nothing happens if the student exceeds that time limit
Enforced Time Limit: instructor provides an amount of time that students are allotted for the quiz (Note, the timer starts the moment the student enters the quiz; it is NOT based on the instructor-set Start Date of the quiz)
Coming soon: Auto-submit of the quiz. Currently (prior to July 2023), students must submit the quiz with an enforced time limit. The quiz does not auto-submit. However, after July 2023, instructors can select whether the quiz should auto-submit after the allotted time expires.
Paging:
All questions displayed together: all questions appear on 1 page
1 question per page**: only 1 question per page is displayed, and students must answer 1 question at a time.
5 questions per page**: 5 questions are displayed at a time, and students must answer 1 question at a time.
10 questions per page**: 10 questions displayed at a time, and students must answer 1 question at a time.
Add page break after each section**: Each section is displayed on a new page
Legacy paging: If a quiz was created using the legacy quiz creation experience, other paging options were available and will be kept until the instructor edits it. You will not be able to go back to legacy paging once you choose another paging option.
**The instructor can determine whether students can jump around or must complete it chronologically
Shuffle Quiz
Select this option if you want each student to see a different order of questions
Display:
Allow Hints: If you added “Hints” to questions during the creation process, you must select this option in order for students to see them.
Disable Email, Instant Messages and Alerts within Brightspace (not recommended): please use caution when using this setting as it disables internal functionality and can cause unnecessary confusion. This does not inhibit students from accessing other tools outside of brightspace, so its usefulness is limited.
End Date: If a student starts the quiz just before the end date, that student is in and there is no ability for the system to kick them out/stop them from working past the set End Date. The End Date simply controls when a student can click on and Start a quiz. It doesn’t do anything to people who have already started.
Time Limit: The time limit countdown on a Quiz starts as soon as a student starts the quiz. It is not dependent on the Start Time or End Time set on the Quiz date restrictions/availability. No matter when a student starts the quiz, they will get the full allotted time limit set on the quiz. Also, its important to note that once the timer starts, it does not stop. So if a student leaves the quiz in the middle of taking it, the timer will continue counting. It does not “pause” until the student returns to continue the quiz. If there is a time limit set on a quiz, the student is expected to complete it in one sitting.
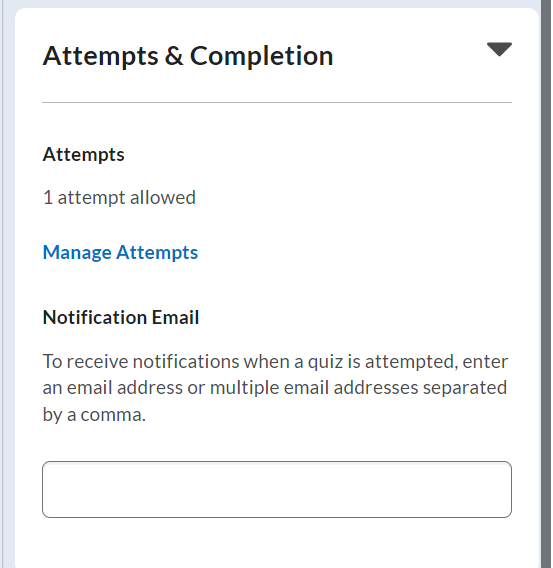
Attempts and Completion
Attempts:
The default setting is 1 attempt allowed. You can change this under Manage Attempts and your options include:
1 attempt
Unlimited***
2 to 10 attempts***
***If you select unlimited or an option for than 1 attempt, you will also select the “overall grade calculation” (ie: Highest grade is kept) and whether on subsequent attempts, if the student should re-take the whole quiz, or will only need to re-take the questions they got incorrect.
Notification Email (not recommended): entering your email address will send an email to that email address each time a quiz is submitted by a student.
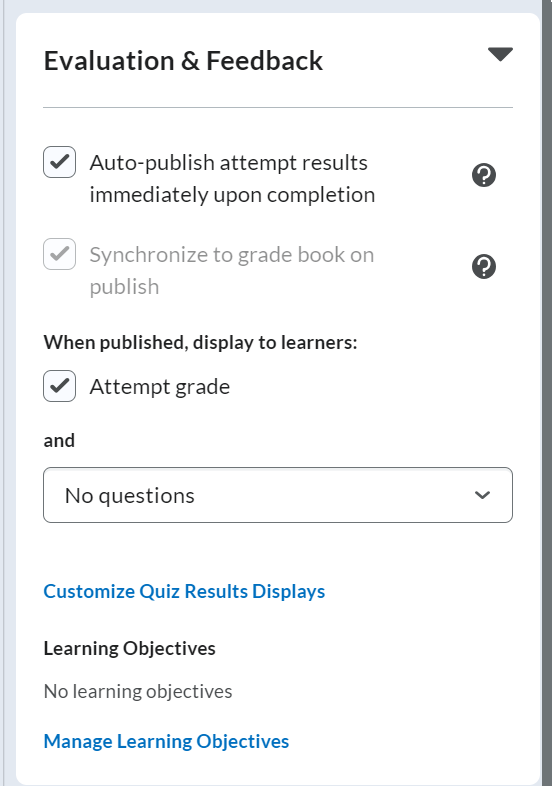
Evaluation and Feedback
Auto-publish attempt results immediately:
Default ON: Only de-select this option if you want all student attempts to remain ‘ungraded’ and scores unviewable.
Synchronize to grade book on publish:
Default ON: This is dependent on the quiz being added to the gradebook, and will automatically send the scores there upon student submission. Only de-select this if you don’t want the scores to be sent to the gradebook.
When Published, display to learners:
Default-Attempt Grade and No Questions (This means student will see their score (overall %) after they submit (assuming the first box is checked), but they will not see which questions they got right or wrong.
Other Options:
- Incorrect questions only, with correct answers
- Incorrect questions only, without correct answers
- All questions, with correct answers
- All questions, without correct answers
After you have added questions to your quiz and customized your settings, click Save and Close.
Your Quiz will appear under your course’s Quizzes tool. You can add the quiz to Content using the Existing Activities menu, select Quizzes, and then select the existing Quiz from the list.