This knowledge base entry assumes you have created assignments in Brightspace, and students have already uploaded their assignments to their assignment folders.
This knowledge base entry does NOT use Turnitin and assumes your assignment is not associated with Turnitin.
- Go to Assignments through Assessments from the Navbar.
- Click on the assignment you want to grade.
- Click on the student’s assignment on the left side or Evaluate on the right side.
- If you clicked on the student’s assignment, the annotation toolbar will appear.
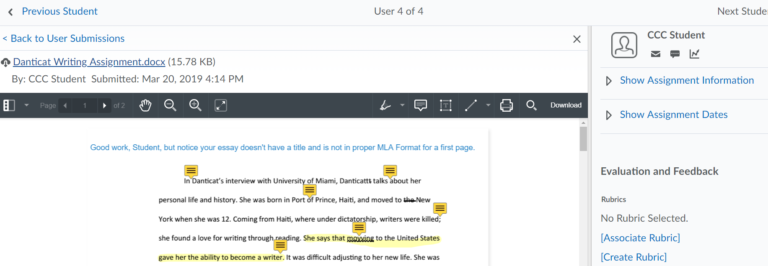
- If you clicked Evaluate, now click on the student’s assignment. The annotation toolbar will appear (see figure below).

Marking the Submission
- Use the magnifying glass icons to adjust size on your screen.
- Use the pen icon to highlight or mark on the submission.
- Use the note icon to leave comments on the submission. Notice you can move the comment bubble once you post it on the submission to exactly where the student should read it.
- Use the textbox icon to write comments directly on the submission. Use this for shorter comments. Use the note icon for longer comments.
- Use the line icon for shapes or diagrams on the submission.
- The print icon will print the notes you made as the first page followed by the submission with your markings.
- Use the search icon on the far right to find something on the submission.
- Use the download button to download the submission with the markings.
- Click Save Draft at the lower right if you are not finished and do not want to release to the student yet.
- Click Publish at the lower right if you are finished and want to release your feedback to the student.
- After you finish, use the Next Student indicator at the top to mark the next assignment.
Evaluation and Feedback
- On the right side, you can enter overall feedback, use a rubric for feedback and enter points/grade for the submission.
- You may also provide feedback by recording audio or video or uploading a file.
View this Brightspace tutorial for tips about how to mark with the tools:
